Tuskaninny - Printer friendly version

Start by drawing a small circle for the head. Next, draw a wide, flat oval shape across the bottom of the larger circle. This will become your Tuskaninny's jaw and cheeks. Now, it's time to draw your Tuskaninny's body. It is a large, thick kidney shape.


Next, add two small circles for the eyes and one squashed circle for the nose. These are shown in red in this picture.

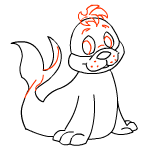
The next stage of drawing a Tuskaninny is creating its tail. It is easier to just draw the red outline than trying to break it into smaller shapes. If that doesn't work the first time, then try again.

Now draw your Tuskaninny's paws. Its left paw (the one on your right) will be slightly hidden behind its body, so you only have to draw a few of your Tuskaninny's toes.

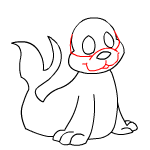
It's time to add a little detail. Draw a line all the way across the face (so that it cuts through the top of the flat oval shape). Next, draw another curve (an upside down smile shape) that cuts through the line you just drew. You have now drawn its nose. Lastly, make two wide "U" shapes that meet under your Tuskaninny's nose to form its mouth.

After making sure that you don't have any extra lines, add some more detail to your drawing. First, place a small circle inside each eye for the pupils. Then, add some short curved lines over your Tuskaninny's eyes (for its eyebrows) and another short curved line just above its nose. Make some dots on the Tuskaninny's snout for its whiskers, and give its tail more detail. Finally, add a tuft of hair and your Tuskaninny is complete!

Once you have finished sketching your Tuskaninny, you can add some colour and shading. This will make your picture look much more life-like.