 Your Very Own Jhudora Plushie
by dragonsflame_uk
--------
Admit it - you've always wanted a plushie of Jhudora, haven't you? Well, now you can make your very own, with just wool, a crochet hook, some stuffing, and a lot of patience!To make this crochet plushie, you will need:
- a 3mm crochet hook (US size C crochet hook)
- knowledge of how to do the DC (double crochet) stitch (US single crochet - SC)
- DK (US light worsted) wool in the right colours (dark purple, green, skin colour, black and white)
- a sewing needle for the finishing touches
- toy stuffing
- to know how to crochet a circle using the magic ring method
Abbreviations:
ch - chain
dc - Double Crochet (US Single Crochet)
dc 2 tog - DC two stitches together (decrease)
sl st - slip stitch All the pieces are crocheted in a spiral (so no joining any rounds apart from the first one), or crocheted in rows.
....but don't worry if you can't crochet - you can always bug a friend or relation to crochet it for you! On to the pattern!
*
Body base Using purple wool, make a magic ring dc 6 into the ring (6 DC) 2 dc in each stitch (12 DC) (2 dc in next stitch, dc) repeat for one round (18 DC) (2 dc in next stitch, dc, dc) repeat for one round (24 DC) (2 dc in next stitch, dc, dc, dc) repeat for one round (30 DC) (2 dc in next stitch, dc, dc, dc, dc) repeat for one round (36 DC) (2 dc in next stitch, dc, dc, dc, dc, dc) repeat for one round (42 DC) dc in the back loops only for one round (42 DC)
....this leads us on into the main body.
dc in each stitch (42 DC) (dc 2 tog, dc, dc, dc, dc, dc) repeat for one round (36 DC) dc in each stitch (36 DC) (dc 2 tog, dc, dc, dc, dc) repeat for one round (30 DC) 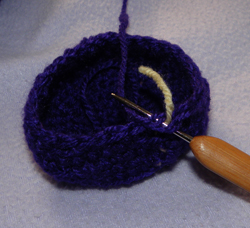
I used the yellow wool as a stitch marker to help keep track of where each round starts dc in each stitch (30 DC) (dc 2 tog, dc, dc, dc) repeat for one round (24 DC) dc in each stitch (24 DC) (dc 2 tog, dc, dc) repeat for one round (18 DC) This is the waist - we now need to stuff the base, otherwise it will be too challenging to do later! 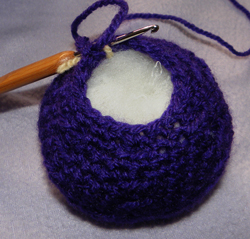
the stitch marker yellow wool marks the end of each round - this is the back dc, dc, dc, dc, dc, dc, dc, 2dc in next stitch, dc dc, 2 dc in next stitch, dc, dc, dc, dc, dc, dc, dc (20 DC) dc, dc, dc, dc, dc, dc, dc, dc 2 tog, dc, dc, dc 2 tog, dc, dc, dc, dc, dc, dc, dc (18 DC) change to white wool and dc for one round (18 DC) change to skin colour and dc for one round (18 DC)
Fasten off.
Stuff the rest of the body. 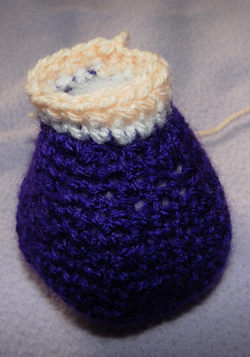
*
Body front Using green wool, we're starting from the neck & working down: ch 4 turn, ch1, dc 3 (3 DC) turn, ch1, 2 dc in next stitch, dc, 2 dc in next stitch (5 DC) turn, ch1, dc 5 (5 DC) turn, ch1, dc 2 tog, dc, dc 2 tog (3 DC) turn, ch1, dc 3 (3 DC) turn, ch1, 2 dc in each stitch for one round (6 DC) turn, ch1, dc 6 (6 DC) turn, ch1, (2 dc in next stitch, dc) repeat for one round (9 DC) turn, ch1, dc 9 (9 DC) turn, ch1, (2 dc in next stitch, dc, dc) repeat for one round (12 DC)
Fasten off. 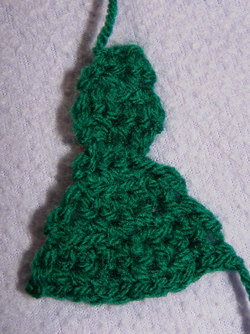
*
Arms - make two of these before the sleeves Using skin tone wool: ch 6 and join to make a ring dc in each stitch for two rounds (6 DC) dc 2 tog, dc, dc, dc 2 tog (4 DC) dc in each stitch for one round (4 DC) dc 2 tog, dc 2 tog (2 DC) dc 2 tog (1 DC)
Fasten off - I didn't use any stuffing in the arms at all. 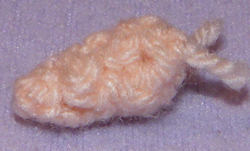
*
Sleeves - make two Using purple wool: Leave a long tail from the slip knot, so you can stitch the arms to the body later. ch 6 and join to make a ring dc in each stitch for three rounds (6 DC) dc in each stitch for one round, joining to chain round of arms (6 DC)
This round might seem a little fiddly, but if you're patient, it should make sense. 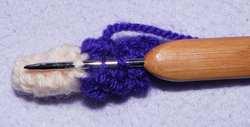
2 dc in next stitch, dc, 2 dc in next stitch, dc, 2 dc in next stitch, dc (9 DC) dc in each stitch for two rounds (9 DC) I didn't add any stuffing to the sleeves at all, but you can add a little if you like.
Fasten off.
*
Head Using skin tone wool, make a magic ring dc 6 into the ring (6 DC) 2 dc in each stitch (12 DC) (2 dc in next stitch, dc) repeat for one round (18 DC) (2 dc in next stitch, dc, dc) repeat for one round (24 DC) (2 dc in next stitch, dc, dc, dc) repeat for one round (30 DC) dc in each stitch for four rounds (30 DC) (dc 2 tog, dc, dc, dc) repeat for one round (24 DC) (dc 2 tog, dc, dc) repeat for one round (18 DC) Stuff the head now, and stitch on eyes, eyebrows & mouth (dc 2 tog, dc) repeat for one round (12 DC) (dc 2 tog) repeat for one round (6 DC)
Fasten off with a long tail to attach it to the neck. 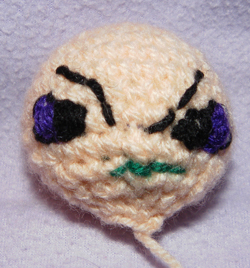
*
Hair Using purple wool, make a magic ring dc 6 into the ring (6 DC) 2 dc in each stitch (12 DC) (2 dc in next stitch, dc) repeat for one round (18 DC) (2 dc in next stitch, dc, dc) repeat for one round (24 DC) (2 dc in next stitch, dc, dc, dc) repeat for one round (30 DC) dc in each stitch for two rounds (30 DC) We now start to work in rows, to make the hair look right - otherwise Jhudora won't be able to see out! dc 25 stitches around (ignoring the rest) for one round (25 DC) turn, ch1, dc 2 tog, dc 22 stitches around, ignoring the last stitch (23 DC) turn, ch1, dc 2 tog, dc 20 stitches around, ignoring the last stitch (21 DC) turn, ch1, dc 2 tog, dc 20 stitches around, ignoring the last stitch (21 DC) turn, ch1, dc 2 tog, dc 18 stitches around, ignoring the last stitch (19 DC) turn, ch1, dc 2 tog, dc 16 stitches around, ignoring the last stitch (17 DC) turn, ch1, dc 17 stitches across (17 DC) turn, ch1, dc 17 stitches across (17 DC) turn, ch1, dc 17 stitches across (17 DC) turn, ch1, dc 17 stitches across (17 DC)
Fasten off with a long tail to attach it to the head.
*
Wings #1 - make two Using purple wool ch 3 turn, ch1, dc into second chain from hook, dc (2 DC) turn, ch1, 2 dc in each stitch (4 DC) turn, ch1, 2 dc in each stitch (8 DC) turn, ch1, 2 dc in each stitch (16 DC) turn, ch1, dc in each stitch (16 DC) turn, ch1, dc, (2 dc tog, dc) repeat for one row (11 DC) turn, ch1, dc, (2 dc tog) repeat for one row (6 DC) turn, ch1, dc in each stitch (6 DC)
Fasten off, leaving a long tail to attach the wing to the body.
*
Wings #2 - make two Using green wool ch 4 turn, ch1, dc into second chain from hook, dc, dc (3 DC) turn, ch1, 2 dc in each stitch (6 DC) turn, ch1, (2 dc in next stitch, dc) (9 DC) turn, ch1, dc in each stitch (9 DC) turn, ch1, dc in each stitch (9 DC)
Fasten off, leaving a long tail to attach to wing #1. Line the chain row of the green wing (wings #2) with the chain row of the purple wing (wings #1), and stitch them together, making sure one wing is a mirror-image of the other 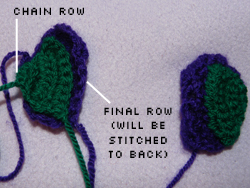
*
To Make Up Carefully line up the green to the front of the main body, and firmly stitch it around.
Stitch the neck to the base of the head (the hair will cover part of the neck at the back, so don't worry if your stitches are a bit messy!). Make sure the hair is lined up correctly and carefully stitch it to the head, leaving the base parts of the hair unattached to look more natural. 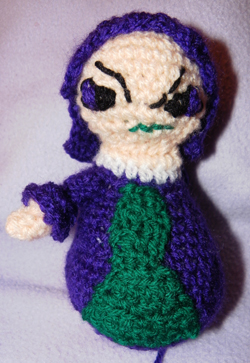
Stitch the sleeves to the body.
And last but by no means least, Jhudora needs her wings! Line up both wings to either side of the centre of Jhudora's back, and carefully stitch them to the body.
Then just double check that all the wool ends are woven in.
And there you have your completed Jhudora crocheted plushie! 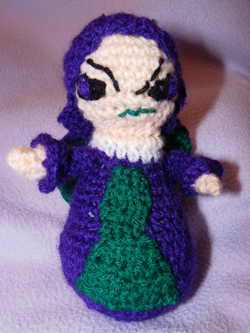
|