 Volcano Run II: Detailed Game Breakdown
by crazyace01
--------
Ah, Volcano Run. Once regarded as one of the more difficult Neopets games, it has since been replaced by the slightly less challenging sequel, Volcano Run II, but it still has that dramatic Zimmer-esque violin theme. Getting your 1,000 neopoints may not be as hard as it once was, but earning a trophy for this game can be extremely challenging. Luckily, there are a few key strategies that can make attaining a trophy go from nearly impossible to quite doable with a little time and practice.Introduction
According to the game's description, Glubgar, the inquisitive Tyrannian Scorchio, has accidentally flown too deep into a volcano. Apparently he was too smart for his own good. I shall leave a discussion of Tyrannia's severe lack of educational infrastructure for another time. It's our job to successfully help Glubgar navigate through the tunnels while avoiding a variety of obstacles that even a Scorchio will find a bit too hot for comfort. To that end, you click and hold to rise, release the mouse to drop, and use the C and V keys to slow down and speed up, respectively.
Points are acquired in two ways. You earn points continuously just by staying alive and flying along; the farther you get, the more points. Each round, you have three lives – three chances to fly as far as possible. The game takes your single best distance for the round when calculating your score. The second way to earn points is to pick up the bonus gems that are hovering around the caverns. This bonus is added to your best distance to make your overall score. The main reason Volcano Run is difficult is because touching anything – even slightly – results in instant death. The first image below shows a shot of the game in motion just after starting, and points out a few important details. 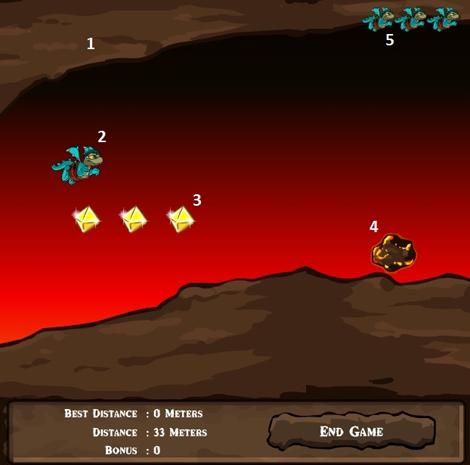
- This is the cavern wall. Don't touch it, it's hotter than it looks!
- This is your character, Glubgar. No part of his body can come into contact with obstacles. I've gotten away with a brush of the tail or wings here and there, but for the most part, the game is quite accurate when it comes to death.
- These are bonus gems. They always occur in sets of three.
- This is a floating rock. They're the easiest obstacle to avoid. They're either motionless, or they hover straight up and down, quite predictably.
- This displays your remaining lives.
Below the game screen, you can see the distance you've flown on your current life, your best distance so far in the current round, as well as the bonus points you've accumulated. It's important to note that while your distance resets with each life, your bonus points carry through! They key to getting 1,000 neopoints is maxing out your bonus value. Obstacles and ObjectsBefore we get into strategic details, let's observe a few of the things you'll find in the cavern. Bonus Gems 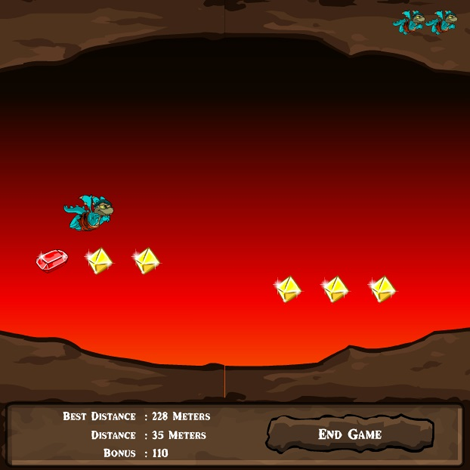
Gemstones always occur in sets of three, though, if you get lucky, you can get a cave like that image, large enough for two sets of three! The yellow gems (topaz?) are worth ten points each, while the red rubies are worth 20 points each. If you miss some gemstones, don't panic! I'll get into the details later, but as long as you're below a certain bonus point total, the game will always send you more gems to pick up. It's better to survive and miss a few gems than it is to take a risk and start your distance over again. There is always a single fireball for every set of gems. Keep an eye out when you see them – it's going to fly in right behind them, and sometimes right on top of them! Once you collected 450 or more bonus points, the game will stop creating bonus gems, and start throwing sets of triple fireballs at you. Beware! Fireballs 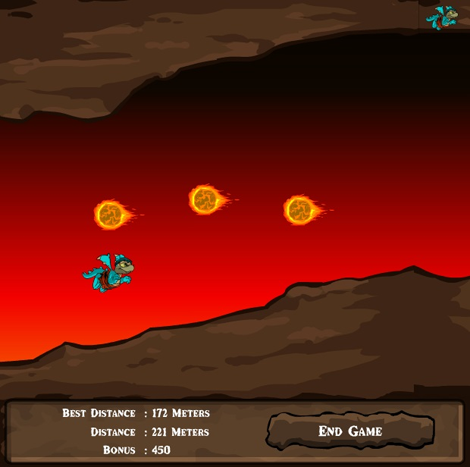
Fireballs are one of the most dangerous obstacles in the volcano. Unlike the floating rocks, they fly toward you at various speeds, some fast, some slow. Early on, fireballs come alone, usually with a set of gems. Sometimes, you'll get two in a wider cavern. After you've collected 450 or more bonus points, they start appearing in sets of three in much thinner caverns, which is a real headache, especially if you've got a floating rock already taking up space. However, this detail can be used to great advantage – more on that later. Lava Geyser 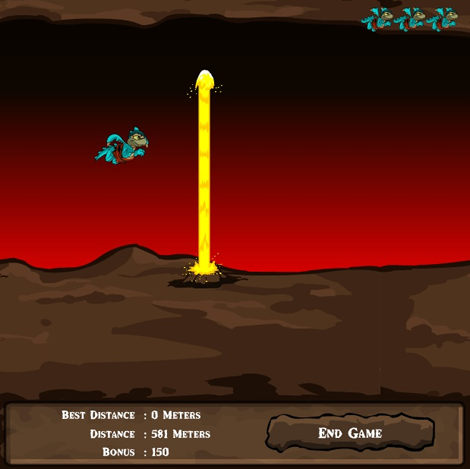
Lava geysers look scary, and they might kill you the first time you encounter them, but once you learn the timing, they become about as easy to avoid as the floating rocks. They usually occur in sets of two or three, sometimes in larger series (my screenshot shows the last one in a set of two). They all fire about simultaneously every few moments. This requires you to fly up to a gap between the geysers, hover in place until they fire off, and then continue on once the danger has passed. Don't worry, it's less complicated than it sounds. You'll only see the geysers after you've reached a distance of over 500 meters. Shield 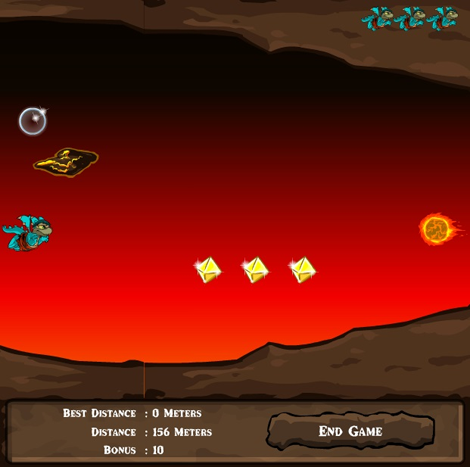
You can see the shield, Volcano Run's only powerup, floating on the upper left hand side of the screen. Picking it up grants you a one-time second chance if you strike an object. In the original game, it lasted until you hit something, making it an invaluable must-have tool. Unfortunately, it now only lasts about ten seconds or so. I don't go out of my way for it - it's usually more trouble to grab than it's worth. Basic Strategy – Neopoints in the BankNow, the moment you've been waiting for. Enough about the game - how do I win?! As of the time of this writing, the conversion rate is 0.69, which means you need 690 points to get 1,000 neopoints. Your score is the sum total of your best distance within three lives and whatever bonus you've accumulated over all three lives. If your goal is merely to get 1,000 neopoints, you've just got to practice! Try to collect the bonuses as you see them. The game won't "change" until you reach a bonus of 450 or a distance of about 500 meters. By the time you get to 500 meters, you've had more than enough time to get 450 bonus points, and vice versa, so you don't need to worry about harder sections of the game. I find that the best place to position yourself is about a third of the way from the left side of the screen. This gives you room to drop back if needed, while allowing you plenty of time to react to what's coming at you. Don't fly to close to the front, or you're liable to get torched by obstacles you couldn't see coming. There are various types of caverns that the game randomly pieces together to form your volcanic causeway. As you play the game, you'll get a sense of each one and be able to predict what's coming based on the structure you observe. Caverns filled with floating rocks are wide and tend to be easier to navigate; they are devoid of fireballs. Caverns with only fireballs are medium sized; fireballs also tend to come when the cavern size changes from large to thin, or the other way around. You'll also see very thin tunnel sections. Here, the only obstacle are the walls closing in around you! In those instances, try hovering in place by rapidly clicking the mouse button. I use the V key to speed up through the absolute thinnest portions. The less time you spend there, the less likely it is you'll strike the wall by clicking too long or letting Glubgar drop too far. Advanced Strategy – Trophy HuntingIf you're going for a trophy, hunting for an avatar, or just trying to knock your friends down a peg, things get a little more complex. There are two events in the game related to your distance score. Once you reach approximately 500-600 meters, you'll start seeing lava geysers. These aren't too difficult to dodge. Once you reach 1,000 meters, the game becomes much more difficult, almost impossible. Normally, this doesn't come into play, but you need to take it into consideration when trying for the highest total possible. The game is also affected by your bonus score. Once you've accumulated 450 bonus points, the game stops spawning bonus gems, and you'll start getting the triple fireballs obstacle. These are extremely dangerous, especially in thin tunnel sections. So what to do? You tend to get over 450 bonus points even before you start seeing lava geysers. To get anything close to the high score table, you'll need at least 1,000 distance. That means you'll be forced to survive a triple fireball bonanza for close to 600 or even 700 meters. The answer is really quite simple – don't pick up the bonus gems. At least, not all of them. Repeated tests have shown that even if you collect 440 bonus points, the triple fireballs will never come, and the game will keep giving you gems. As soon as you pick up one more gem, however, all bets are off, and you get pelted with volcanic fire. Controlling your bonus score gives you some control of your environment. The less dangerous the environment, the higher your chances of survival, and the easier it is to get a high distance score. This needs to be combined with one more piece of information. After 1,000 meters, no matter what your bonus is, the game shifts gears and actively tries to kill you. See the image below. 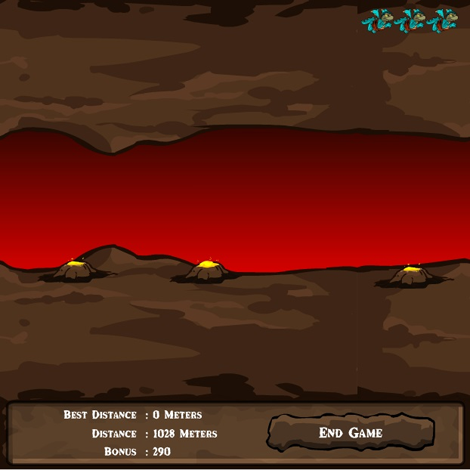
This is what you'll be facing at high distances. NOT shown are the occasional rocks and fireballs that shoot through that tiny tunnel. Oh, and Glubgar isn't there either – he was a necessary sacrifice in the name of taking a screenshot! Essentially, it's a nightmare combination – almost no room to maneuver, rocks, fireballs, and geysers, all at the same time. The top listings in the high score table is essentially a fight between people surviving for as long as possible at this end-game stage.
If I'm attempting a high-score run, I generally collect 300 or so bonus points, then hold there; that gives a little wiggle room, just in case I'm forced into picking up gems because of the obstacles. Some time before hitting 1,000 meters, you'll want to collect your last gems, maxing out your bonus. In a perfectly ideal situation, you would hold at 440 bonus points, then wait for a larger cave that spawns two sets of gems at once. That would maximize the bonus at 500 points, or more, if you were lucky enough to get a ruby. 1,000 distance and 500 bonus points – that's a 1500 point total. Check the high score table for the game – there's no one above 1,600 points at the time I'm writing this. That's because no one can survive more than 90 meters at the last stage! It's that difficult! It's also hard to practice this part, because you have to slog through the rest of the game to get there, and it tends to be highly lethal. You can see in my screenshot of the end-game section that I had a very low bonus. I was curious to see if holding out a low bonus score would reduce the difficulty of the final part. It does not! So make sure you max out that bonus a good while before you get to 1,000 meters, even if you do have to tackle a few triple fireball caverns. Without a maximized bonus, it's much harder to be competitive with your score. That's all the advice I have for you! I've analyzed the game to the depths of the volcano and back. Be aware of the dangers of the cavern, and you can easily make 3,000 neopoints a day from this game. With time, it's perfectly possible to snag a trophy for your cabinet. One last bit of advice for trophy seekers, that applies to all games. Try to do your absolute best at the beginning of a new month! That's when the high score tables reset. As the month goes on, people entrench themselves in the rankings with very high scores. Earlier on, you've got a better chance of slipping in and raking in an award. Good luck, and godspeed!
|