 A Neopian's Guide to Destruct-o-Match III
by parody_ham
--------
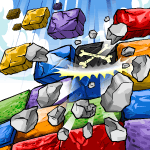
A scream of frustration erupts from your room twice as loud as any roar ever heard on the face of Neopia. Your pets stare at you in shock as you nearly throw your handy mallet out of the second story window. What could this madness be? One simple phrase says it all: Destruct-o-Match III. Does this describe your struggles with this game of strategy? If so, please read on. Destruct-o-Match III is a game that consists of the pairing of similarly colored bricks together in order to score points. As the game progresses, the minimum score to pass the level and the number of colored bricks both increase. Sounds easy, yes? Well, in reality, this game is not nearly that simple. A few key tips to start you off are the following:
Play on Classic mode as there is a larger area to make huge combos (especially with x3 bricks). Though large combos are very necessary to make it through a level, be aware of your surrounding bricks so there are possible combinations available after you make this grouping.
The less bricks remaining at the end of a level (up to ten), the more bonus points are possible.
TAKE YOUR TIME! One of the most common ways you can ruin your score is through rushing! This game has no timer so there is no need to click in a hurry!
Play with the sound on low (as opposed to off). If playing with low sound is not possible, be on the lookout for timed bricks. In some levels, you may have a brick with a timer on it. If this timer is allowed to go to zero, it becomes invincible. Before this happens, there will be a warning sound a few seconds before it becomes unusable. Another note, the timer brick will be a randomly selected color and if it surrounds bricks of the same color, they become invincible as well.
Similar to many other avatar games, it is best not to look at your score in later levels. The closer you are, the more nervous you become!
As with many other games, practice makes perfect! After a while, you should be able to successfully predict the position of the bricks.
Now that you are more familiar with the game, the next most important point is your power-ups which are the following:
Overkill: This power-up (which resembles a paintbrush being snapped in half) can be used to rid a screen of one color block. A word of warning before you use this power-up: make sure you collect the points from all the groupings of that color. If you don't, you are losing points that you cannot get back! Multiplier: (Looks like three roasted turkey legs) More than likely, this power-up is the most important one in the game as it triples the score of your combo. Practically the only way to make it past the 240 minimum score level and beyond is with the usage of the multiplier. Explode: Just as the name suggests, this volcano resembling power-up explodes nearby blocks (all within one space of it-including diagonally). Best used toward the end of a level to explode the remaining blocks. Timer: As mentioned earlier, this nasty timed brick will become unusable once its number reaches zero. Try to get rid of this if possible! Fill: (Three small white boxes within the brick) When clicked, an entirely new row of bricks are formed on top of the grouping that is already there. It is best used when some colors are already gone to prevent unmatchable combinations. If used when only one color remains, a solid row of that color comes down! Morph: This brick will constantly be changing colors which can be advantageous if timed correctly. Used when strategically best- typically towards the end of a level to help clear the board at the end. Caution! If this is not used before the other combos are done, the level ends itself and you miss out on those points!
Wildcard: (Appears to look like two crossing Tyrannian weapons) This power-up can become any colored brick when vertically or horizontally near a group and automatically goes with any chosen group near it. A word of caution: If you are not careful, it is possible to form a combination with the wildcard without realizing and can cause the rows to become uneven or unmatchable. This can be an unpleasant surprise if you planned to use it with another color. Undo: (Big paw print at the bottom of the screen) While playing this game, it is natural that mistakes will be made. To activate this power-up for use, combo a brick that resembles a large beast's head. As long as no power-ups were used in the last turn, the undo power-up can return your screen to its previous appearance as of the last turn.
Shuffle: (Giant wing at the bottom of the screen) The placement of bricks will not always be to your liking. To combat this, once a grouping of bricks containing a Tyrannian Scorchio icon is made, the shuffle power-up can be used. This risky power-up randomly changes the position of the bricks on the screen. Note how I say randomly. The after-effects of this power-up could be even worse than its previous appearance, so think carefully before using it! I recommend its use at the end of the level to attempt a more favorable appearance of the blocks. When you are playing levels with a requirement of 220 points or more, rearranging the last uneven rows can bring you to the amount of points that you require in order to pass this level. The Levels and their requirements:
Levels one and two:
Level requirements: 100 and 120 These levels are the most critical to score high in. At the beginning of the first level, if there is not a prevalent color (especially if no power-ups are present), restart the game. In both of these levels, it is very important to score over three-hundred. How is this possible you may ask? The bonus offered at the very end of the level is based on the number of bricks remaining. If no bricks are left, one-hundred extra points are added to your score. Needed score by the end of the level: Level 1: 300+ Points Level 2: 600+ Points Level 3: Addition of yellow brick Level requirement: 140 By the time you reach level 3, you will notice yellow bricks. Every two levels after level three will add extra color brick which makes creating a long combo much harder to do! Minimum score: 900+ Level 4:
Level requirement: 160 Points By the end of this level, you should hopefully have found and made a combo with a multiplier brick. Making large combos with these is crucial as the game becomes increasingly difficult to do so past level 4. If you have not done a multiplier or x3 combo by the point, it is your call as to whether you want to continue. I recommend going to at least level six before restarting. Either way, the more practice, the better you will do in the future. Approximate score: 1250+ Level 5: Addition of black brick Level requirement: 180 Points Similar to level four, try to make as many large combos as possible and multiplier bricks are very helpful if you have one present. Approximate score: 1500+ Level 6:
Level requirement: 200 points Try to make level six's score count! It may be the last level you can get substantially above the minimum (unless you are lucky). Approximate score: 1850+ Level 7: Addition of Red brick Level requirement: 220 Multipliers are almost a necessity in this level; it is quite common to miss the level requirement by just a few points. Remember, if you are slightly below the requirement and still have your shuffle power-up (as well as one available combo so that the level does not end), there is a chance that you will be able to make the requirement if the shuffle power-up works in your favor. Approximate score: 2100+ Level 8:
Level requirement: 240 points Practically the only way you can survive this level is with a multiplier or x3 combination. I have never been able to make it through this level without one. Try to be mindful of the future positions of the bricks and try to make the best combination that you can. Approximate score: 2350+ Level 9: Addition of brown brick Level requirement: 260 points It isn't common to survive this level without a lot of luck! It is very difficult to make points in this level and every point counts as it brings you closer to the avatar. Spend a long time deciding each move and stay calm! This is a good level to save your shuffle power-up for—especially towards the end. Approximate score: 2500+ Now that you are more prepared for this game of strategy, I wish you the best of luck and hope that this guide has prevented structural damage due to flying mallets!
|